

 Shop All Packaging
 Glass Containers
 Plastic Containers
 Metal Containers
 Cardboard Containers
 Bulk Containers
 Industrial Containers
 Caps / Closures
 Shrink Bands
 Design Custom Labels
 Subscribe & Save Orders
 Shop By Industry
 Custom Packaging
 Pallet Qty Packaging
 Packaging Equipment
 Help/Info
 New Products
 Promotions
 Newsletters
 Combo Kit Deals
 Product Closeouts
 Recently Back In Stock


Label Tutorial: How to Create the "Kid's Health Multivitamin" Label
Remember to follow steps 1 - 3 on the
main tutorial page
to initially set up your label document. Then, go through the steps below to create the "great grape" label!
Step 1: Create the Background.
A. Create a gradient.
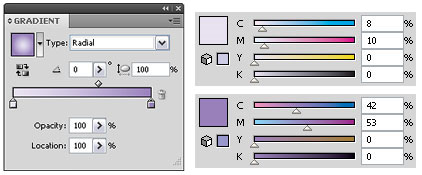
From the Gradient palette, double click the color stops to change each of the colors as shown. Select the rectangle you drew earlier and click anywhere inside the Gradient palette to apply the gradient to the rectangle's fill. Set the gradient Type to Radial.
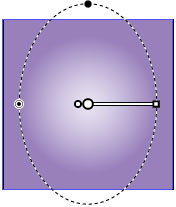
With the rectangle still selected, you can alter the angle, size and shape of the gradient by hitting the "G" key on your keyboard. Click & drag the solid black dot to change the gradient's skew, the white dot with the black center to change its size, and the double white dot to change the angle and center point. Place the cursor over the dotted line for the symbol, then click and drag to rotate the gradient.
With the rectangle still selected, you can alter the angle, size and shape of the gradient by hitting the "G" key on your keyboard. Click & drag the solid black dot to change the gradient's skew, the white dot with the black center to change its size, and the double white dot to change the angle and center point. Place the cursor over the dotted line for the symbol, then click and drag to rotate the gradient.
B. Make a sunburst effect.
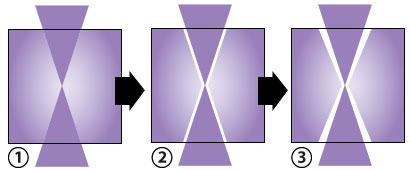
Start with a double-triangle shape which will be repeated in order to create the desired effect.
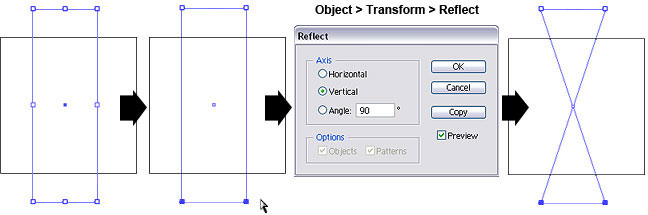
Draw a rectangle a little taller than the artboard. Select the bottom two points using the direct selection (white arrow) tool. From the main menu, click Object > Transform > Reflect, choose the Vertical axis and click OK. You should now have a symmetrical double-triangle. Fill the shape with dark purple.
Start with a double-triangle shape which will be repeated in order to create the desired effect.
Draw a rectangle a little taller than the artboard. Select the bottom two points using the direct selection (white arrow) tool. From the main menu, click Object > Transform > Reflect, choose the Vertical axis and click OK. You should now have a symmetrical double-triangle. Fill the shape with dark purple.
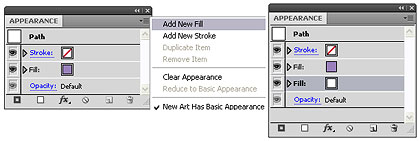
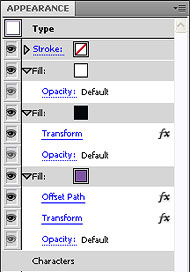
1. In the Appearance palette menu, select Add New Fill. Click on the fill and drag it below the first purple fill layer. Change the color to white.
2.
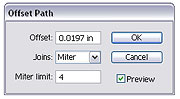
With the the white fill still selected, click on the Effects button at the bottom of the Appearance palette. Choose
Path > Offset Path
. Enter a positive number in the Offset field so that the white fill extends outside the purple layer. Click OK.
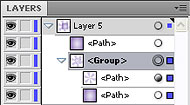
3.
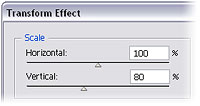
Select the white fill again, click on the Effects button
and choose
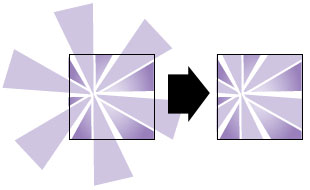
Distort & Transform > Transform
. Reduce the amount of vertical Scale until you get the desired effect and then click OK.
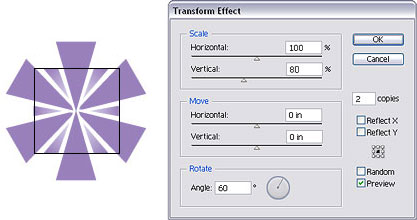
4.
Select the Path in the Appearance palette, click on the Effects button
and choose
Distort & Transform > Transform
. Depending on how slim you have made your triangles, adjust the number of copies and the angle of rotation until you have created a pinwheel effect, as shown.
For a more subtle look, set the opacity of the purple layer to 40% by clicking on the triangle to the left of the fill and the Opacity link underneath it. Move the shape so it is offset from the center and adjust the size and rotation angle with the Selection Tool as needed.
For a more subtle look, set the opacity of the purple layer to 40% by clicking on the triangle to the left of the fill and the Opacity link underneath it. Move the shape so it is offset from the center and adjust the size and rotation angle with the Selection Tool as needed.
Use a clipping mask to remove artwork extending outside the label area.
1.
Copy the path with the gradient from the Layers palette by selecting it and clicking
Edit > Copy (Ctrl + C)
. Select the sunburst layer and then clicking
Edit > Paste in Front (Ctrl + F)
. Select the two layers below the pasted layer: in the Layers palette, click on the corresponding circles to the right of each path while holding down the Shift key. Group these two layers together by clicking
Object > Group (Ctrl + G)
from the main menu.
2.
Select the top path and the group of paths, then click
Object > Clipping Mask > Make
. Now you will be able to adjust the shapes below while keeping them bounded inside the artboard.
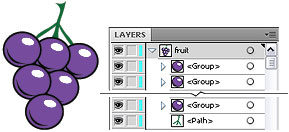
Step 2: Draw the fruit image.
1.
Create a circle using the Ellipse Tool
. Fill it with the dark purple color and a black stroke. Add a white highlight by creating another smaller oval on top of the purple one, and a black accent with the Arc
or Pen
tools.

2.
Group these paths by selecting all of them and hitting
Ctrl + G
. Copy the group and paste it five times to create separate grapes. Select each group and move it to form a cluster.
Draw a stem using the Pen or Blob Brush tools. Select the path and move it underneath the grape groups in the Layers palette.
Draw a stem using the Pen or Blob Brush tools. Select the path and move it underneath the grape groups in the Layers palette.
Move the group into the label artboard and resize it as needed with the Selection Tool.

Step 3: Style the text.
A. Write your text and select a font.
Select the Text Tool
, click inside your document and begin typing. If different parts of the text will have separate styling, it is best to keep them in separate text layers. This label example uses the font Cooper Std, but feel free to choose another style if you'd like.
B. Style the heading.
1. From the Appearance palette, remove any fills and strokes. Select Add New Fill from the dropdown menu and make it white.
B. Style the heading.
1. From the Appearance palette, remove any fills and strokes. Select Add New Fill from the dropdown menu and make it white.
2.
Replicate the fill by clicking the Duplicate Selected Item icon
. Move it below the original fill and change it to black. Click the Effects icon and choose
Distort & Transform > Transform
. Under the Move section of the dialogue box, offset the fill slightly to the bottom right by increasing the Horizontal value and decreasing the Vertical value. Duplicate this fill layer and move it to the bottom of the stack.
3. Change the bottom layer to dark purple. It should already have the Transform effect applied. Extend the color outwards by selecting the Effects icon and choosing Path > Offset Path . Increase the value until you reach the desired effect.
3. Change the bottom layer to dark purple. It should already have the Transform effect applied. Extend the color outwards by selecting the Effects icon and choosing Path > Offset Path . Increase the value until you reach the desired effect.
4.
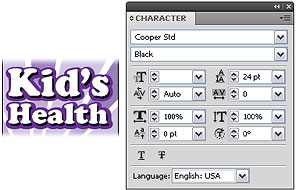
With your text selected, work inside the Character and Paragraph palettes to change its size, letter spacing and alignment.
In the Character palette , use the following fields to�
Set the font size
Set the leading (spacing between lines of text)
Set the tracking (spacing between characters)
In the Paragraph palette , use the following fields to�
Set the text alignment
Set the text indent and spacing before & after paragraphs.
For this example, highlight the top part of the text with your mouse and change its size to 32 pt. Change the bottom text to 24 pt. Select all of the text and change the leading to 24 pt to decrease the space between the lines. The text alignment is left-justified. Your text and Character palette should now look something like the image shown above.
C. Style the description text.
1. Select the "great grape!" text layer and make any changes from the Character palette as described above in part B-4.
Add a new fill, making it dark purple. Replicate the fill by clicking the Duplicate Selected Item icon . Move it below the original fill and change it to white. Click the Effects icon and add an Offset Path to outline the text with the white fill.
Change the angle of the text by selecting it with the Selection Tool and hovering the mouse outside one of the corners of the text's bounding box until you see the rotate symbol. Click and drag until you reach the desired angle. Or, you can select the text and click on
Object > Transform > Rotate from the main menu and enter a specific angle (we used 25 ° )
 .
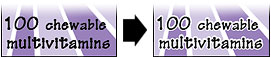
.2.
Select the final text layer and change the font to Feltpoint (or any other font you'd like to use) and make any other changes as described in part B.
Add a new black fill. Duplicate the fill, move it below the original fill, and change it to white. Add an Offset Path to outline the text with the white fill.
Add a new black fill. Duplicate the fill, move it below the original fill, and change it to white. Add an Offset Path to outline the text with the white fill.
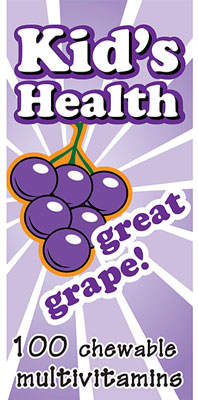
Make sure all of the components are arranged how you like them and your label is done! Print it out on adhesive label paper, cut it out and apply to your container. Voila!
For a shortcut, click on the finished label image to view and print a PDF .
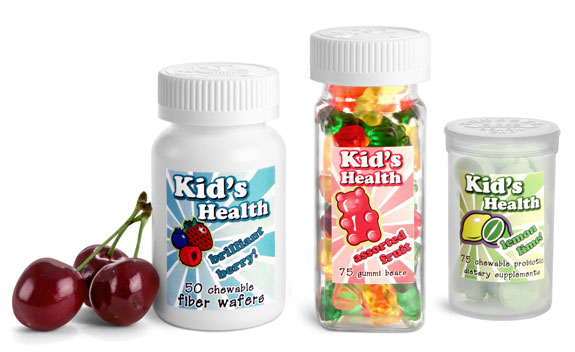
To see how this label looks on a filled container, click on the image in the box to the right. Be sure to browse through our Nutritional Supplements Index for other great label ideas
For a shortcut, click on the finished label image to view and print a PDF .
To see how this label looks on a filled container, click on the image in the box to the right. Be sure to browse through our Nutritional Supplements Index for other great label ideas
Custom Label Ideas You May Like
 Nutritional Supplement Index
Why Businesses Choose SKS Bottle & Packaging
SKS Bottle & Packaging makes it easy to order bottles, jars, and packaging supplies online. From fast shipping to flexible savings programs, our goal is to help businesses of all sizes source reliable packaging with a smooth and efficient ordering experience.
Chat with Us