
 Shop All Packaging
 Glass Containers
 Plastic Containers
 Metal Containers
 Cardboard Containers
 Bulk Containers
 Industrial Containers
 Caps / Closures
 Shrink Bands
 Design Custom Labels
 Subscribe & Save Orders
 Shop By Industry
 Custom Packaging
 Pallet Qty Packaging
 Packaging Equipment
 Help/Info
 New Products
 Promotions
 Newsletters
 Combo Kit Deals
 Product Closeouts
 Recently Back In Stock


Label Tutorial: How To Create The "Mason Jar Favor" Labels
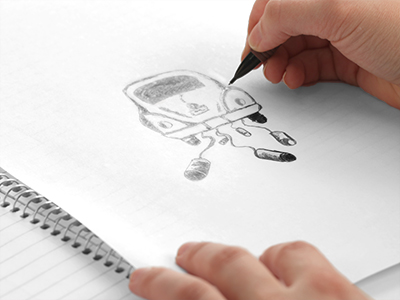
Step 1: Draw the Car
To create the "vintage" feel draw the car on a piece of white paper and then use a scanner to get your image onto the computer. To draw the car you can trace our drawing, or draw your own car. After drawing the car scan the drawing at the highest resolution possible (300-600dpi). Open your scanned image in Photoshop by opening Photoshop and choosing File>Open and choose the car drawing that you just scanned.
Step 2: Create the Car Illustration
A. Remove the white background.
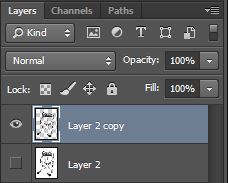
1. Open your scanned image in Photoshop. To remove the white background, copy your background layer by pressing CRTL + J (PC) or Command+J (MAC). Make the original background layer invisible by selecting the eye icon next to the layer.
2. Make sure you are on your new layer and from the top menu choose select > color range which will open a dialog box with an eye dropper tool. Use the eye dropper to click in the white space surrounding your image (you may have to click in a few areas to select all of the white) click ok. You should see a selection line surround your car drawing. If you are unsatisfied with your selection click CRTL + D (PC) or Command + D (MAC) to deselect and repeat this step until your are satisfied. If satisfied with your selection, press backspace or delete to remove the white background.
B. Adjust the contrast
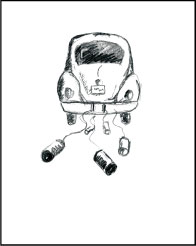
1. Convert your image to grayscale by choosing Image >mode > grayscale from the top menu. A dialog box will appear asking if you want to discard the color infomation. Click OK, this will convert your image to black, white and gray.
2. To adjust the contrast in your drawing choose Image> Adjustments> Levels. Make sure the preview box is checked, this will allow you to see the changes that you are making to your image. Try moving the sliders to the left and right until you are satisfied with the contrast then click OK.
3. If you want to make illustration a color, choose image> mode > duotone and a dialog box will appear. Click inside the white box and choose the color you would like the car to be. Name the color. You may add up to 4 colors to make various color blends. Click OK.
4. Save you image as a .TIF file by choosing file > save as. Choose the location where you would like to save your file, name the file, and choose .TIF from the save as type menu. Click OK.
Step 3: Create the Label
A. The Label Shape
1. To create the label start by creating a new Adobe Illustrator file. To do this begin by opening Adobe Illustrator and choose File > New from the top menu. Leave all settings and Click OK.
2. To create the background of your label click on the Rectangle Tool and place your cursor at the upper left-hand corner of the artboard and drag down to the lower right corner and release to create a basic rectangle. Our label dimensions are 3 in x 3.75 in. After drawing your rectangle you can change the dimensions by making sure the rectangle you created in selected and in the top menu on the right enter the dimensions that you would like your rectangle to be.
3. Leave a black stroke around your label. This will allow you to easily see your label dimensions, the stroke will be removed at the end of the tutorial. To make a black stroke, select the rectangle that you create using the selection tool and in the top left corner click the stroke button and select the black color swatch. This will be the border that your artwork must fit in.
4. Choose File > Place and choose the car image that you made in step 2. A cursor will appear with your image attached to it, click inside the artboard to place image in the Illustrator file.
5. To resize your image hold shift and click and drag one of the corners on your image until it fits comfortably within the borders you created for your label.
B. Add the Text.
1. To add text, choose the Type Tool from the left side menu. Choose the font and font size you would like from the top menu. For our label we used Palatino size 14 pt. Choose Bold from the top menu and type Eat, Drink and Be Married. You can use the selection tool to position the text with in the label borders.

1. To add text, choose the Type Tool from the left side menu. Choose the font and font size you would like from the top menu. For our label we used Palatino size 14 pt. Choose Bold from the top menu and type Eat, Drink and Be Married. You can use the selection tool to position the text with in the label borders.
For the names of the wedding couple click character
from the top menu and choose small caps. Make your type size 11.5 pt and Bold. Type the names you would like to appear on your label and position with the selection tool as necessary.

4. For the date, change the type to be Italic and keep the size at 11.5 pt. Type the date you would like to appear on the label and position with the selection tool as necessary.

Use the Selection tool to move any label components and arrange them however you would like. Now your label is done! Print it out on adhesive transparent label paper, cut them out and apply to your containers. Voila!
For a shortcut, click on the finished label image to view and print a PDF .
To see how this label looks on a filled container, click on the image in the box to the right. Be sure to browse through our Wedding Favors Index for other great food label ideas!
For a shortcut, click on the finished label image to view and print a PDF .
To see how this label looks on a filled container, click on the image in the box to the right. Be sure to browse through our Wedding Favors Index for other great food label ideas!
Why Businesses Choose SKS Bottle & Packaging
SKS Bottle & Packaging makes it easy to order bottles, jars, and packaging supplies online. From fast shipping to flexible savings programs, our goal is to help businesses of all sizes source reliable packaging with a smooth and efficient ordering experience.
Chat with Us