

 Shop All Packaging
 Glass Containers
 Plastic Containers
 Metal Containers
 Cardboard Containers
 Bulk Containers
 Industrial Containers
 Caps / Closures
 Shrink Bands
 Design Custom Labels
 Subscribe & Save Orders
 Shop By Industry
 Custom Packaging
 Pallet Qty Packaging
 Packaging Equipment
 Help/Info
 New Products
 Promotions
 Newsletters
 Combo Kit Deals
 Product Closeouts
 Recently Back In Stock


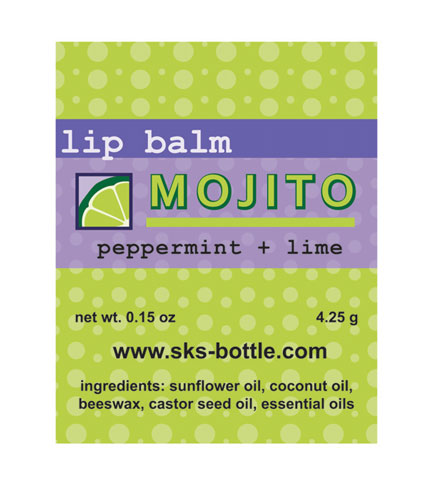
Label Tutorial: How to Create the "Mojito" Lip Balm Tube Label
Remember to follow steps 1 - 3 on the
main tutorial page
to initially set up your label document. Then, go through the steps below to create the "Mojito" label!
Step 1: Change the Background Color for the Lip Balm Label
The label size used here is
1.875" x 1.5"
, which is a great fit for our 0.15 oz oval or round
lip balm tubes
. This label is available in
clear
,
white glossy
, or
white matte
finishes.
To draw a rectangle exactly to these dimensions, select the Rectangle tool and click once inside the document. This will bring up the rectangle dialog box where you can enter width and height values. Select the square using the Selection or Direct Selection tools, or click on the circle next to the path in the Layers palette. To make the square lime green, change the values in the Color palette to C=32, M=4, Y=91, K=0.
To draw a rectangle exactly to these dimensions, select the Rectangle tool and click once inside the document. This will bring up the rectangle dialog box where you can enter width and height values. Select the square using the Selection or Direct Selection tools, or click on the circle next to the path in the Layers palette. To make the square lime green, change the values in the Color palette to C=32, M=4, Y=91, K=0.
Step 2: Draw the Background Shapes
A. Create the Purple Rectangles
2. The second rectangle should be 1.5" by 0.2". In the Color palette, change the values to C=68, M=69, Y=0, K=0. Use the Selection tool to place this rectangle right below the first.
3. Make the dimensions of the third rectangle 1.5" by 0.5". Change the color to C=35, M=44, Y=4, K=0. Use the Selection tool to place this rectangle below the second.
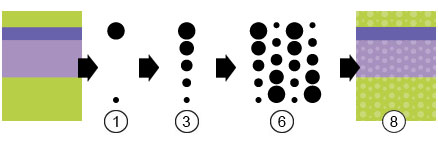
B. Create the dotted pattern.
1. Begin by drawing two circles with the Ellipse tool; one should be larger than the other. For this example, the small circle has a 0.025" diameter; the larger circle is 0.1".
2. Space the circles so the large one is at the top of the label and the small one is at the bottom. Make sure the circles' center points are in line with each other. If you have Smart Guides turned on (Ctrl+U), a green line should appear indicating whether or not the paths are aligned.
3. Select both circles using the Selection tool or by clicking the circles next to the paths in the Layers palette, while holding down the shift key. From the menu, select Object > Blend > Blend Options . Choose "Specified Steps" from the Spacing dropdown menu, enter a value, and click OK. For this label, the value is set to 13.
4.
Run the blend between the two circles: Object > Blend > Make (Alt+Ctrl+B).
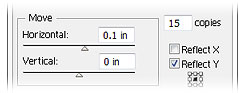
5. There should now be a group named "Blend" in the Layers palette. Make sure it is selected, and then click the Effects icon at the bottom of the Appearance palette. Select Distort & Transform > Transform.
6. Increase the Horizontal Move value to about 0.1 in. Enter a value of 15 for copies. Check the Reflect Y box, which will alternate the pattern. Click OK.
7.
Position the pattern over the label shapes drawn in Step 2A. In the Layers palette, order the paths so the thin purple rectangle is on top, followed by the dot pattern, the large purple rectangle, and the green background at the bottom.
8. With the blend group active, change the color to white. From the Transparency palette, reduce the opacity to 25%.
8. With the blend group active, change the color to white. From the Transparency palette, reduce the opacity to 25%.
Step 3: Draw the Lime Slice
A. Create the fruit wedges.
1. Using the Ellipse tool, make three ovals; two larger ones at the top, one smaller at the bottom, forming a triangle shape as shown. The exact size doesn't matter as you will resize the lime slice later.
2. Draw a triangle connecting each of the circles using the Pen tool. Click to create an anchor point within each circle. Complete the path by clicking on the original point.
3. Select the three ovals and triangle with the Selection tool, holding down the Shift key to activate multiple shapes at once.
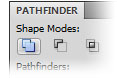
4. In the Pathfinder palette (Shift+Ctrl+F9), choose the first Shape Mode, "Unite." This will join the shapes into a single path.
1. Using the Ellipse tool, make three ovals; two larger ones at the top, one smaller at the bottom, forming a triangle shape as shown. The exact size doesn't matter as you will resize the lime slice later.
2. Draw a triangle connecting each of the circles using the Pen tool. Click to create an anchor point within each circle. Complete the path by clicking on the original point.
3. Select the three ovals and triangle with the Selection tool, holding down the Shift key to activate multiple shapes at once.
4. In the Pathfinder palette (Shift+Ctrl+F9), choose the first Shape Mode, "Unite." This will join the shapes into a single path.
5.
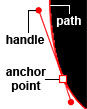
To make the shape more rounded, use the Pen tool while hovering over corner points. The tool should have minus sign to the right of it when hovered over an anchor point. Click once to delete the point. Continue until you have the desired shape.
6. Use the Direct Selection tool to change the length and angles of the anchor points' handles. By altering the lines that extend from the anchor point, you can adjust the curve of the path. Continue until you create a rounded triangle.
7. Change the color to C=32, M=4, Y=91, K=0.
6. Use the Direct Selection tool to change the length and angles of the anchor points' handles. By altering the lines that extend from the anchor point, you can adjust the curve of the path. Continue until you create a rounded triangle.
7. Change the color to C=32, M=4, Y=91, K=0.
8.
9. Make sure the Bounding Box is activated (Shift+Ctrl+B or View > Show Bounding Box). With the Selection tool, click the second triangle and hover the cursor outside of one of the corner points. It should turn into a curved double arrow.
10. Rotate and move the shape so it lines up with the edge of the first triangle. Make sure there is a small, even space between them as shown.
11. Repeat steps 8-10 to make a third triangle.
B. Add the inner rind.
1. Select all three triangles either with the Selection tool or by clicking the circles next to the shapes in the Layers palette, while holding down the Shift key.
2. In the menu bar, click Object > Path > Offset Path . Increase the value so the path extends outside the original shapes as shown.
3. Select the Unite shape mode from the Pathfinder palette to combine the offset paths into one.
4. Make sure this path is below the original three in the Layers palette by clicking on it and dragging it to the bottom.
5. Change the color of this layer to a light green: C=6, M=1, Y=18, K=0.
6. Use the Pen and Direct Selection tools to smooth out the top and even out the bottom right area and extend it outwards a bit.

C. Add the outer rind.
1. With the light green shape still selected, choose Object > Path > Offset Path from the menu bar again. This time, increase the value about twice as much as the last offset.
2. Change the color to a dark green: C=90, M=30, Y=95, K=30.
3. Use the Pen and Direct Selection tools to smooth out the top outer edges.
4. Group all of the lime layers together. Either:
- Select each layer by holding down the Shift key and clicking the circles next to each path in the Layers palette or - Click and drag the Selection tool to create a rectangle around the shape. Release the mouse to select all the paths at once.
Then choose Object > Group (Ctrl+G).

D. Create the Purple Background and Outline
1. Using the Rectangle tool, hold down the Shift key and draw a square around the lime slice. Adjust the lime shapes with the Direct Selection tool if needed for it to fit inside of the square.
2. Duplicate the square by copying it (Ctrl+C) and pasting it behind the lime slice (select the lime group, and then click Edit > Paste In Back [Ctrl+B]). Change the color to a light purple: C=21, M=27, Y=2, K=0.
3. In the menu bar, click Object > Path > Offset Path. Increase the value so the path extends outside the original square. Change the color to a dark purple: C=93, M=93, Y=33, K=25.
4. In the Layers palette, select both the top square path and the lime group. From the menu, choose Object > Clipping Mask > Make. This will hide the parts of the lime that are outside the frame of the square.
Step 4: Style the Text
"lip balm"
- Courier New bold font, 12 pt size in white, left aligned.
"peppermint + lime" - Courier New bold font, 7.5 pt size in black, center aligned. Tracking is set to 50 to create more space between the letters.
"net wt..." - Arial bold font, 5 pt size in black, center aligned.
web address - Arial bold font, 7.5 pt size in black, center aligned.
ingredients - Arial bold font, 5 pt size in black, center aligned.
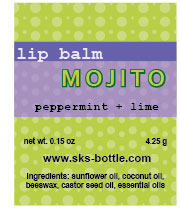
Mojito
- Corbel bold font, 16 pt size in lime green, C=32, M=4, Y=91, K=0.
1. From the Appearance palette, add another color by clicking on the Add New Fill icon at the bottom.
2. Change the color to a dark green, C=90, M=30, Y=95, K=30 and drag the fill so it's below the Characters line.
3. With the dark green fill selected in the Appearance palette, click the Add New Effects icon.
- Click Path > Offset Path and enter a value of 0.01 in. Click OK. - Click Distort & Transform > Transform. Enter 0.005 in under Horizontal and Vertical Move to offset the path to the bottom right. Click OK.
Step 5: Finishing Touches
A. Text
1. Make sure the text layers are at the top of the Appearance palette. Use the Selection tool to move the text created in Step 4 as shown.
B. Lime slice
1. Make sure the Bounding Box is activated (Shift+Ctrl+B or View > Show Bounding Box). With the Selection tool, click on the lime slice drawn in Step 3 and hover the cursor over one of the corner points. It should turn into a 45 degree double arrow. Click and hold down the Shift key while you drag inwards to make the lime smaller. Situate it next to the "Mojito" text.
C. Mojito underline
1. With the Rectangle tool, draw a rectangle as long as the "Mojito" text, in line with the lime slice. Make it lime green: C=32, M=4, Y=91, K=0.
Once all components are laid out how you like them your label is done! Print it out on adhesive label paper, cut them out and apply to your containers or purchase the 1.875" x 1.5" label
, which is a great fit for our 0.15 oz oval or round
lip balm tubes
. This label is available in clear, white glossy or white matte
finishes.
For a shortcut, click on the finished label image to view and print a PDF .
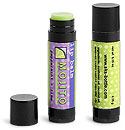
To see how these labels looks on a filled container, click on the image in the box to the right. Be sure to browse through our Lip Balm Index for other great lip balm label ideas!
For a shortcut, click on the finished label image to view and print a PDF .
To see how these labels looks on a filled container, click on the image in the box to the right. Be sure to browse through our Lip Balm Index for other great lip balm label ideas!
Custom Label Ideas You May Like
 Lip Balm Index, Black Plastic Lip Balm Tubes
Why Businesses Choose SKS Bottle & Packaging
SKS Bottle & Packaging makes it easy to order bottles, jars, and packaging supplies online. From fast shipping to flexible savings programs, our goal is to help businesses of all sizes source reliable packaging with a smooth and efficient ordering experience.
Chat with Us