

 Shop All Packaging
 Glass Containers
 Plastic Containers
 Metal Containers
 Cardboard Containers
 Bulk Containers
 Industrial Containers
 Caps / Closures
 Shrink Bands
 Design Custom Labels
 Subscribe & Save Orders
 Shop By Industry
 Custom Packaging
 Pallet Qty Packaging
 Packaging Equipment
 Help/Info
 New Products
 Promotions
 Newsletters
 Combo Kit Deals
 Product Closeouts
 Recently Back In Stock


Label Tutorial: How to Create the "Creamsicle" Candle Jar Labels
Remember to follow steps 1 - 3 on the
main tutorial page
to initially set up your label document. Then, go through the steps below to create the "Creamsicle" label!
Step 1: Change the Background Color for the Rectangular Label
Select the rectangle you drew in the previous step using the Selection
or Direct Selection
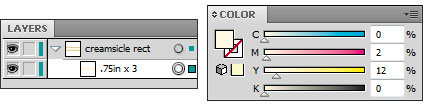
tools, or click on the circle next to the path in the Layers palette. The rectangle used here is 3" x 0.75". Enter the following values in the Color palette to change the color to a light yellow: C=11, M=0, Y=40, K=0.
Step 2: Draw lines.
Select the Line tool and draw from one edge of the rectangle to the other. Hold down the Shift key which will insure the line is straight. You can draw the lines freehand or space them evenly by using rulers. To enable the rulers, go to View > Rulers > Show Rulers or simply press Ctrl+R. Draw four lines, two near the top and two at the bottom of the rectangle.
A. Change the line weight and colors.
1. Using the Selection or Direct Selection tools, click on each of the lines. Select all four at once by holding down the Shift key as you click each line.
2.
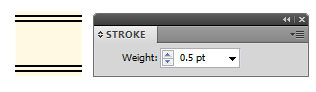
For this example label, the stroke weight has been changed from 1 pt to 0.5 pt. Make sure the Stroke palette is open (Ctrl+F10) and select a new weight from the dropdown menu.
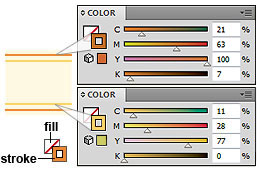
3. Select the top-most and bottom-most lines only. In the color palette, click the stroke icon (the square with a grey square inside it) to bring it above the fill icon (a solid square). Change the color to a dark orange: C=21, M=63, Y=100, K=7 and leave the fill icon blank (a white square with a red line through it).
4. Select the other two lines and change the color to a dark yellow: C=11, M=28, Y=77, K=0.
Step 3: Style the text.
A. Use Effects to Create Depth
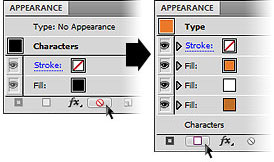
1. The font used for the "Soy Candle" text is "Plantagenet Cherokee" set to 17 pt size and 80 tracking. The character palette used is shown here. Working in the Appearance palette (Shift+F6), remove any inherited fills and strokes on the text. Double click the line that reads "Characters," then click the "Clear Appearance" icon at the bottom of the palette.
2. Click on the top line that reads "Type." Click on the "Add New Fill" icon as shown to add three fills which will make up the 3D text. The top fill color is C=5, M=64, Y=97, K=0. The middle fill is plain white (CMYK set to 0) and the bottom fill color is C=21, M=63, Y=100, K=7.
3. Select the top-most fill and click on the Effects icon at the bottom of the Appearance palette. Choose Path > Offset Path to enter an offset value. For this example, enter 0.0034 in and click OK.
A. Use Effects to Create Depth
1. The font used for the "Soy Candle" text is "Plantagenet Cherokee" set to 17 pt size and 80 tracking. The character palette used is shown here. Working in the Appearance palette (Shift+F6), remove any inherited fills and strokes on the text. Double click the line that reads "Characters," then click the "Clear Appearance" icon at the bottom of the palette.
2. Click on the top line that reads "Type." Click on the "Add New Fill" icon as shown to add three fills which will make up the 3D text. The top fill color is C=5, M=64, Y=97, K=0. The middle fill is plain white (CMYK set to 0) and the bottom fill color is C=21, M=63, Y=100, K=7.
3. Select the top-most fill and click on the Effects icon at the bottom of the Appearance palette. Choose Path > Offset Path to enter an offset value. For this example, enter 0.0034 in and click OK.
4.
Select the white fill and give it an offset value of 0.0085 in.
5. The bottom fill has an offset value of 0.0034 in. With this fill still selected, click the Effects icon again and Distort & Transform > Transform. To offset this layer slightly and give it a 3D look, enter 0.0025 in as the Horizontal and Vertical "Move" values and 7 under Copies. Click OK.
5. The bottom fill has an offset value of 0.0034 in. With this fill still selected, click the Effects icon again and Distort & Transform > Transform. To offset this layer slightly and give it a 3D look, enter 0.0025 in as the Horizontal and Vertical "Move" values and 7 under Copies. Click OK.

B. Create the background text.
1. Follow steps 1 and 2 from section "A" above. Change the font size to 35 pt. Make the top and bottom fills C=5, M=23, Y=96, K=0 and the middle fill white.
2. Follow step 3 above but enter an offset value of 0.0073 in.
3. Follow step 4 above with an offset value of 0.0183 in.
4. Follow step 5 above using an offset value of 0.0073 in. Change both "Move" values under Transform Effect to 0.0055 in.
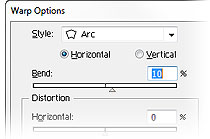
5. To make the text appear curved, first click on the "Type" line at the top of the Appearance palette. Click the Effects icon and choose Warp > Arc. Make sure "Horizontal" is selected and enter 10% as the Bend.
6. Click on Opacity and change it to 45%.
1. Follow steps 1 and 2 from section "A" above. Change the font size to 35 pt. Make the top and bottom fills C=5, M=23, Y=96, K=0 and the middle fill white.
2. Follow step 3 above but enter an offset value of 0.0073 in.
3. Follow step 4 above with an offset value of 0.0183 in.
4. Follow step 5 above using an offset value of 0.0073 in. Change both "Move" values under Transform Effect to 0.0055 in.
5. To make the text appear curved, first click on the "Type" line at the top of the Appearance palette. Click the Effects icon and choose Warp > Arc. Make sure "Horizontal" is selected and enter 10% as the Bend.
6. Click on Opacity and change it to 45%.
7.
In the Layers palette, move this text so it is below the "soy candle" and description text, which will be styled in section C.
C. Style the description text.
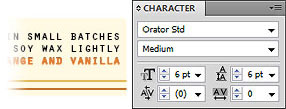
1. The text at the bottom right of the label is simply set to 6 pt "Orator" font with 6 pt of leading between lines.
C. Style the description text.
1. The text at the bottom right of the label is simply set to 6 pt "Orator" font with 6 pt of leading between lines.
D. Final label design.
The Layers palette and label should now look something like this.
The Layers palette and label should now look something like this.
Step 4: Create the Circular Label
A. Draw the circle.
1. Select the Ellipse tool and click once inside your document to bring up the Ellipse dialog box. For this label, enter width and height values of 2.5 in. Click OK.
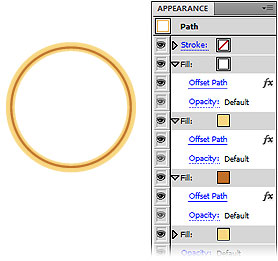
2. In the Appearance palette, remove the stroke. Click the "Add New Fill" icon to add three additional fills so there are a total of four. Set the bottom and second fills to C=3, M=14, Y=58, K=0. The third fill has a color value of C=21, M=63, Y=100, K=7.
3. Offset fills as follows:
- Top: -0.083 in
- Two: -0.06 in
- Three: -0.04 in
- Bottom: none
1. Select the Ellipse tool and click once inside your document to bring up the Ellipse dialog box. For this label, enter width and height values of 2.5 in. Click OK.
2. In the Appearance palette, remove the stroke. Click the "Add New Fill" icon to add three additional fills so there are a total of four. Set the bottom and second fills to C=3, M=14, Y=58, K=0. The third fill has a color value of C=21, M=63, Y=100, K=7.
3. Offset fills as follows:
- Top: -0.083 in
- Two: -0.06 in
- Three: -0.04 in
- Bottom: none
4.
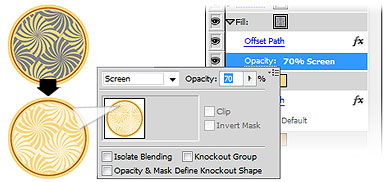
To add the pattern background, begin by selecting the top fill. Open the Swatches palette (Window > Swatches) and click the dropdown menu icon
in the upper right corner. Select Open Swatch Library > Patterns and choose a pattern to use as a background. You could also make your own or download a pattern from the web.
5. To make the pattern muted, change the Opacity to 70% Screen. Depending on the patten you use, you may want to experiment with opacity levels and filters.
5. To make the pattern muted, change the Opacity to 70% Screen. Depending on the patten you use, you may want to experiment with opacity levels and filters.
B. Style the flavor text.
2. From Section A of "Step 3: Style the text", follow 1 and 2. Make the top fill C=5, M=64, Y=96, K=0, the middle fill white, and the bottom fill C=5, M=23, Y=96, K=0.
3. Follow step 3 but enter an offset value of 0.0085 in.
4. Follow step 4 above with an offset value of 0.0213 in.
5. Follow step 5 above using an offset value of 0.0085 in. Change both "Move" values under Transform Effect to 0.0064 in.
6.
Select the Type
tool, click between the "M" and "S" and press Enter to split the text into two lines.
7. Highlight the "sicle" part with your cursor. In the Character palette, change the font size to 51 pt and the leading to 73 pt.
7. Highlight the "sicle" part with your cursor. In the Character palette, change the font size to 51 pt and the leading to 73 pt.
C. Style the description text.
1. The text used here is 16 pt "Orator."
2. Position the text so it is in the space in between the "Creamsicle" text.
3. Set the leading to about 70 pt.
1. The text used here is 16 pt "Orator."
2. Position the text so it is in the space in between the "Creamsicle" text.
3. Set the leading to about 70 pt.

For a shortcut, click on the finished label image to view and print a PDF .
To see how these labels look on a filled container, click on the image in the box to the right. Be sure to browse through our Candle Jars Index for other great candle label ideas!
Why Businesses Choose SKS Bottle & Packaging
SKS Bottle & Packaging makes it easy to order bottles, jars, and packaging supplies online. From fast shipping to flexible savings programs, our goal is to help businesses of all sizes source reliable packaging with a smooth and efficient ordering experience.
Chat with Us